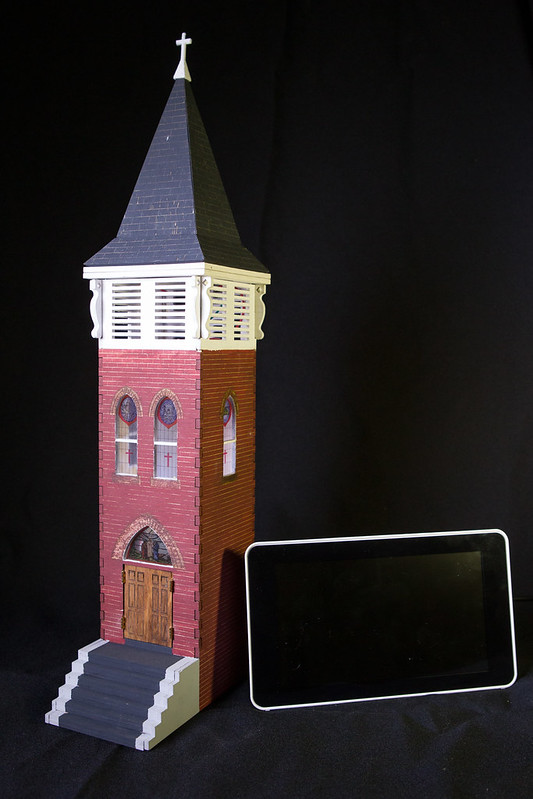
Steeple replica for my grandma
My grandma’s church needed a new chimes system to replace their existing old and broken system.
They needed something that would play bell recordings of Methodist hymns at set times and asked me to come up with one. I decided to build one with a Raspberry Pi running Node.js to play mp3s of bell recordings I made in GarageBand from samples of a bell tower in Ghent, Belgium. More on that setup here
I was also recently checked out on the Trotec laser at the Idea Foundry. I don’t have any specific interest in miniatures but thought it would be cool to make a case for the chimes. Why not build a replica of the steeple that the chimes play from, complete with built in speakers, stained glass and lights?

The Pi
Because the original system was built on Raspberry Pi, I could easily put it in a small case. The Raspberry Pi is small enough already, but they also offer the smaller Pi Zero form factor. Either size would have fit the case I was planning to make. I considered going with the full-sized Pi because that’s what I had worked with already and the Pi Zero doesn’t have easily accessible audio.
With the regular Pi, I would still have to come up with some amplification for the internal speakers. At the same time, Adafruit introduced the Pi Speaker Bonnet that fits nicely on a Pi Zero and uses I2S to create an audio output on Zero and amplify the source for 3W speakers. This was a perfect application for the steeple miniature and a good excuse to try out a Pi Zero. It also ended up being a cheaper option than the full-sized Pi too.
I loaded the same Node system on the Pi Zero as the system running at the church. I’m just not using the browser kiosk that shows which song is playing now, previously or upcoming in this instance. I also had to add a real time clock since the Pi would not keep present time when it is unplugged.
The Speaker Bonnet could then output to a 3W speaker that sits nicely at the top of the tower. The arrangement and use of this speaker changed somewhat, discussed later in this writeup.
The Steeple Design
I wasn’t anywhere near my grandma’s church when I decided to build a replica, so I just started making up measurements based on some pictures, videos and Google Street Views I had. I luckily also had taken photos of every stained glass window in the building for a book I put together with my grandma several years back.
This was going to be my first laser project and the material I was familiar with was various thicknesses of Baltic birch plywood. That seems to be the default on the Trotec at the Idea Foundry. I went with a 1/8” Baltic birch. Knowing that and some of the made up measurements, I began to set a scale for the model. I have no intention of including it in any sort of train set or anything but thought it would be interesting to keep it similar to an existing scale standard. I got pretty close to O-scale but had to make it a little bigger in order to fit the speaker placement I hoped to use.
I drew up the vectors in Illustrator and did some test cuts of different sizes to test out the way the sides would lock together and how the brick pattern would come out. I also tested some of my painting techniques. Not only was this my first laser project but this was really my first wood project and, besides maybe staining some baseboards, my first time painting wood carefully. I used some craft acrylic paint and slapped in on with a foam brush. I tried to brush it on quickly to give it a sort of uneven and faded look.
The Brick
I was debating how to do the brick pattern. I’m sure I had several half-cocked ideas but can’t remember all of my misconceptions. I was interested in a technique Brad was talking about where you would paint something first and then laser it down to reveal the wood underneath as sort of a negative. Or you’d paint the lasered bit and then sand the higher bit. I was trying to consider ways to get a grout and brick look when I thought I’d just laser off the red paint in the areas of the grout. This technique turned out way better than I could have imagined. Also the resolution of the laser really allowed me to go pretty small with the brick pattern. I could have even gone smaller. The etching of the brick was definitely the longest part of the lasering process.
The Roof
I’m a few years removed from trigonometry and was feeling a bit cocky after my first attempt at lasering fit perfectly. What I’m saying is I really messed up the angles when it came time to do the roof. I ended up talking trig with Will Nickley and then he just said “I can do all of this in Solidworks in a few seconds.” And he wasn’t lying.

Because I’m using a laser, I couldn’t cut at any sort of angle. I spent way too much time considering the bevels of how to connect the portions of the pyramid. What I imagined was that hamster that eats miniature burritos using a mini table saw to run a 45 degree angle across all of the triangle pieces. I ended up hand sanding on a sandpaper block. It worked out okay and didn’t chip up the wood but my angles weren’t exactly 45 degrees. I relied on a lot of wood glue to just fill up those gaps. If I was mass producing this, I’d probably build a jig to run along a sandpaper block at the correct angle or even some sort of machine sander.
The Windows
There are 37 windows in the church and every one of them including the steeple attic are stained glass. The four in the attic (and represented on the top portion of the model) hadn’t even been seen by my grandma until they took her up in a cherry picker recently.
Because I already had the image files, I sent a few different sizes of the images to be printed on a transparency at a FedEx Office and picked them up on my way to my grandma’s for Christmas. I had lasered out the bottom portion of the steeple right before Christmas and wanted to show my grandma. I hated to “give” her the steeple as a Christmas present and then take it away to finish it but that’s what I had to do. When people see the steeple that’s what they seem most fascinated by and it’s funny because it’s just a $2 transparency print cut and glued on to the wood. I hope the transparency quality holds up over time.

Accessing the Interior
I lasered and stained some doors and even bought little dollhouse hinges. Even though the hinges are super small they are still technically larger scale than the rest of the model but are kind of a unique touch. I had to file away at the door frame to get the hinges to fit and I really wanted to make them function as actual hinges. They came with really tiny screws that my shaky hands and patience weren’t having any luck with. I managed to glue them in but couldn’t get them to stay on both sheets of wood. I ended up settling on gluing the doors shut. I’m sure to my cousins’ kids that will look super inviting to try to open it but I wish them luck.
To access other portions of the steeple, I made the roof removable as well as what I call the rafters that support the speaker in the top. Both set into place with nested magnets. This technique was another surprise for me. It was just some stupid idea I had and it worked out alright. In reality, I don’t imagine you will need to access the top very much. The speaker is soldered and hot glued in but I left enough give in the speaker wires so that someone can remove the top and look down in at the lighting and the electronics at the bottom.
The bottom step is also removable it reveals the entire bottom panel where the Pi, clock and speaker bonnet sit and where the power comes in and the lighting and speaker wires terminate. I meant to leave enough give in the speaker and lighting wires to accordion out and let someone peek at the electronics there too but I allowed too much give at the top of the speaker wire and not enough at the bottom. I considered soldering some extra length on and may still do that in the future. For now, I’m guessing the steeple is just being admired from afar, and I’m probably the only one that’s going to be comfortable tearing into it.
This bottom step is also attached with magnets recessed into the other stairs as well as built into the lower part of the main tower portion.

The Electronics
I mounted all of the main electronics at the base of the steeple with wires running up the insides for the speakers and LEDs.
The Speaker Bonnet
I soldered some headers on to the speaker bonnet to stack it on the Pi Zero. I also soldered some headers on to the 3V, 5V and Ground breakouts so I could easily connect different LEDs to test and to connect the RTC. I wanted to make sure the LEDs and speakers were easily disconnectable since they would be separate from the base. I ended up soldering wires directly between the clock and the bonnet since the RTC wouldn’t need to be disconnected to free the computer from the base.
The LEDs
The LED lighting delayed progress more than I’d like to admit, mainly because I really had no experience with LEDs. I had an idea for what I wanted the light to come out like. Mainly I wanted the interior to be bright enough that the detail of the windows would come out in a decently bright room. I also didn’t want the light source to be visible and wanted it to shine pretty evenly across all of the windows. I thought a more amber glow like a candle would look nice. I tried some diffused yellow-y LEDs but they were super weak. I tried some super bright white 3mm LEDs but in order to be bright they were made very directional so I didn’t get very even light. I tested some LCD backlights. They were okay but relatively dim and cumbersome. Then I used some RGB Neopixels I borrowed from Kris Kling. These were good but now I’m writing/running code to essentially shine a steady light the whole time.
I ultimately mounted two LED sequins above the window over the front door pointed toward the back wall. This lights up the interior really well. I wish it was a little warmer. I considered gelling it but at that point it was glued in and I felt like the gel might be seen through the door or windows. Plus, I think the cooler color really makes the colors in the stained glass more visible. I also considered connecting one or both of the lights to the GPIO pins and only turning them on when the chimes played. I figured my grandma would prefer to show off the windows and not have to wait until 6pm for a song to play. I considered leaving one always on and waiting to turn one on only when the chimes were playing. I was concerned this would be still too dim for the majority of the viewing and was able to leave my code the same for the full-sized version and the replica version.
The Speaker
I had kinda settled on these brass looking 3W speakers from Adafruit. My opinions kind of got the best of me because I felt like the second best option looked cheesy. It came with a convenient plug that snaps into the speaker bonnet and would have given me some more sizing flexibility. They were considerably smaller. Because I settled on the 3W speakers (a whole $1.95 a piece), I thought I was going to mount them across the top and use the steeple vents as a sort of speaker grille. I even upped the size of my original model, causing me to go outside of my O-scale plans. I ended up screwing up both. I went outside the O-scale bounds and still didn’t leave enough width to mount the speakers across the front and back or sides.
When I got the two speakers plugged in, they were plenty loud so as I was holding the 3” brass-ish speaker and trying to figure out if I was going to cut a groove that would let me force the speaker into the sides I laid it across the top and realized I could just point one speaker directly down into the tower from the roof. I really like the way it came out. It freed up the interior so that the light could sneak out the top as well. If I made this again, I’d try to stay true to the O-scale and size the steeple down a little more.
Delivering the Steeple
Though I first showed this to my grandma at Christmas, I only had the sides lasered out and the windows taped in, so I had to take it back. In March, I went back to West Virginia and was really wishing I had it all together then but instead I could only show her the roof added and the stairs stacked out. I made a point to finish it up right after that and on my way to a photo gig in State College, PA, I made a detour. I dropped it off and she got to hear them from the steeple replica for the first time.
She had a spot picked out for it after she gets done taking it to the real church and showing it to everyone there. The reports I’ve gotten so far is she and Pap both really like the glow of the lights even at night, so I’m glad I stayed with the always-on design.

Final Toll?
I’m thinking this is it for this project. I’m eager to move on to some new ideas. I’ve considered what it would take to replicate it. I wonder if someone else wants a similar model or if I’d even want one of my own to demo with. Though I’m open to taking another crack at it, I kind of like the idea of only my grandma having one.
It was a long drawn out process, but I was learning a ton of things at the same time. I also still have the “Big Boy” chimes. They are also delivered and making sounds, but they have even more room for tweaks and improvements. I’m afraid those will never be truly done although I’m calling them “done” for now. I figure if they are in the wild and serving their purpose they can be called Done. Anything else will just be a different version number.
Tools
Technology
- Raspberry Pi Zero
- Pi Speaker Bonnet
- 3W 4Ohm speaker
- RTC
- LED sequins
- Power supply
- Trotec 400 laser
- Lulzbot 3D printer for the cross
- Node.js for server/playback program
- GarageBand and MIDI to generate the MP3 files
- Illustrator (exported to PDF and then to Corel Draw) for the laser vector files
Materials
- Magnets
- 1/8” Baltic birch plywood
- Paint
- Wire
- Heat shrink
- Glue (Goop, wood, hot)
- Dollhouse hinges
- Cute as hell mini wood clamps
Best Record in Baseball
I’ve been wanting to learn and use D3 for data visualization. I’d done the typical (for me at least) Reading the First Half of a Programming Book. I also took a D3 Lynda course so I had something to show even if it was the standard Follow What The Dude Did On A Screen.
Although I still had a bunch of questions, I thought it’d be best to get my hands dirty and search for answers as I went. I’ve maintained a list of ideas for visualizations for some time but to get started, I wanted to focus more on the tool and less on the design, so I decided to go with an existing one that I’ve always wanted to mess around with.
Craig Robinson (Flip Flop Fly Ball) is great. He’s a great artist and baseball fan. He’s a dude who is from England, discovered baseball while visiting the US with his job in Germany, then watched the Blue Jays while living in Toronto and now lives in Mexico City. I’ve grown up around baseball and compared to Craig’s history, watching it for me was pretty effortless.
I’ve followed Craig’s work for some time, and I love seeing what I saw as a 4 year old through the eyes of an adult discovering it for the first time. Plus, as an artist, Craig is able to visually articulate thoughts I’ve had but couldn’t get out of my brain. I’ll admit even as an adult I dream about cool locations for ball fields. Occasionally Craig would just throw up a sketch of a baseball diamond and I’m like “That’s it! That’s a field I want to see!”
Here are a few of his sketches:
- An Island Where a Baseball-Like Sport is Played
- Fibonacci Fields
- Cardinals’ spring training at a quarry
- I’d give good money for these last three to exist/belong to me:
- Perfect life
- Baseball field near a cliff
- Ballpark in the forest - I’ve thought about this since I was 4
Besides his sketches, Craig also has really unique ideas on the other medium of choice for baseball fans: numbers. He doesn’t do necessarily the deep number crunching of a sabermetrician but comes up with some very clear thoughts on things that stand out in baseball.
For “The Best Record in Baseball”, Craig has visualized an interesting issue that highlights the effect of wild cards and divisions on the outcome of the Playoffs and World Series. Craig’s design is a clean but static one. As I’ve learned about D3 and started seeing clean visuals being made with it, I always thought this would be a great target.
So it’s not an original idea but I thought it would first, be good practice for me in learning D3 and second, would allow me to expand on it with some features that let you dig a little deeper into each team/season.
Here’s my current progress. And here’s the git repository. For now I’m calling this finished. There are a few more tweaks that could occur but I’m thinking about the next visualization. Hopefully a more original one.
Some to-dos
-
Add large tooltip on hover to dive into each team -
Tweak color scheme and add legend to explain what the hell the colors mean -
Blend tied teams' blocks together much like Craig did - Incorporate scaling to allow for additional seasons/different browser sizes more easily
- Fix hover location when page is zoomed away from 100%
- Text on tiedAbove boxes are technically off by OFFSET / 2. Fix it!
New site
I built my new personal website (this one. right here.) using Jekyll.
GiveBackHack
I’m considering a move to Columbus and thought what better way to get to know the situation than immerse myself in it for a weekend. I met the organizer of the GiveBackHack when she was the facilitator for the first Startup Weekend I attended in Cedar Rapids.
The format was very similar to Startup Weekend. The main difference being it was solely focused on ideas based around social good. I’ve done several Startup Weekends and taken one of my ideas through one. Since then, I’ve changed my approach and look to join on with an idea that I’m interested in.
This time I joined an idea that interested me because it seemed to be pretty data-centric. It was focused on the idea in presidential elections that you need to get similar people elected in more local elections if you want to effect change. The idea was spurred when the leader, Charlie, read this article.
We ultimately didn’t propose a final solution but more research on what would help get people more involved with local elections. I definitely learned a lot about the political system and, as expected, became more cynical of it. Ultimately I would argue that our efforts were focused on getting more money involved in politics even if it is “better” money since it would have been individual money. It could be pointed out that we were less focused on direct social good than other teams.
I still had fun and met a lot of cool people and learned new things about Columbus.
I was in charge of our slide deck and I worked a final joke slide in as usual. I texted Jayne that if the joke lands then my work here is done and I’d be happy with the weekend’s results.

Orioles baseball hackathon
My friend Aaron emailed me with a link that had a couple of my favorite words in it: baseball and hackathon.
Aaron and I can have 5 hour long conversations, but there were no other words in his email. None necessary. I emailed back “Road trip?”

What the Orioles were proposing was a data analytics hackathon with a baseball angle to it. There really wasn’t much more info besides it was going to be hosted by the Orioles at Camden Yards. I didn’t need any more than that.
They were looking for teams of 3-6. I knew Aaron would be a great candidate and his girlfriend Alex, an even better one. I felt pretty good about putting together a sales pitch for the three of us. I still tried to manage my hopes and confidence. As a college baseball fan, I see how deep the draft goes and how few actually make it.
The application requirements fit us pretty well. They asked us to answer three questions: our baseball experience, our data experience and our web experience. Although each of us had good answers for all three, we were able to each share a specialty in one. We hit on Aaron’s experience obsessing over baseball and things like sabermetrics. We hit on Alex’s job and experience at Slalom, a consulting firm where she presents data all day, not to mention her Tableau community experience. And I was Web Guy.

We sprinkled in some overall baseball love for all three and decided to go with an obscure Orioles reference for the team name: Milt Pappas and the Expected Outcomes. We explained:
As Reds fans and sympathizers, Alex Duke, Aaron Lehr and Zach Sanderson couldn’t help but wonder if Bill DeWitt hosted a baseball analytics hackathon in 1965, maybe Milt would have stayed an Oriole and Frank Robinson a Red.
We assumed the Orioles knew the history of Milt. Aaron, the more seasoned Reds fan, explained his significance to me.

I had some hackathon experience, but most of that came from hosting one and not participating. I also knew that every hackathon is different, so my experience didn’t mean much. Based on the feel of the room when we first came in, I thought this would be a pretty technical competition. The Orioles ended up providing us a huge data dump of Pitch F/X data and asking us to come up with something creative, actionable and functional for the front office to use.
We worked to our strengths. I’ll just say now though: mine were limited. The hackathon is 8 hours and though I’ve done some data work with large hospital datasets, “rapid” was never in the vocabulary. I definitely filled a more administrative role for the team.
Aaron’s strengths were definitely useful. I’d say he came out as our Opinions Guy. Sure, pretty pictures of numbers are great, but Aaron was able to best articulate why it mattered. Aaron and I talk about this stuff all the time, so I kind of knew where he stood.

But Alex, Alex was insane. I of course don’t know her as well as a guy I’ve known since kindergarten. I’ve seen links to her Tableau visualizations and certainly saw their quality, but I’d never seen her work in real time. About 6 hours in she had put together a fantastic dashboard-esque visualization in Tableau. And then she and Aaron had a moment of doubt. “This isn’t saying anything.”
At that point, my argument, as been-to-a-hackathon-before guy, was “Who cares. We need to ship it.” That’s the antithesis of me in real life. I’m constantly trying to battle my perfectionism and what better place to do it than a hackathon with the clock ticking. They overruled my vote and completely ripped the engine out. With 90 minutes left.
I honestly did not come in looking to win any prizes. I knew the event itself would be fun. They were saying, “We’re not going to win if we aren’t saying anything.” My response (mostly internal) was, “Oh well. Then we didn’t win. Still fun though.”

In the last hour, I put together a slide deck and handled some administrative-y communication stuff with the hackathon staff while Aaron and Alex put the engine back together.
Aaron was our presenter and was going to go off of bullet points that he and I put in the slideshow. We started with a brief overview of our initial plans. Aaron presented it really well. Even squeezed a laugh out of the room. To me this had all the trappings of a good “Well this is what we were going for,” white flag-type hackathon presentation.
Our last bit was to present what we ended up with. Alex was sitting next to me on the floor and took over the mouse as Aaron walked through some scenarios on the dashboard. When Alex started mousing around, it was really my first time seeing it in an hour or two, since I was getting the presentation ready. I hope the judges weren’t looking because I’m sure I was visibly surprised. I had no idea what she had put together in the final minutes. Every idea or suggestion Aaron said, she just hovered over or clicked and that information was presented.

Go to the Tableau page to see the final interactive visualization
Aaron’s explanation was perfect. Alex’s demonstration was perfect. I even advanced the slides at the right time.
I was a lot more confident when we finished, but I didn’t know how the judges would see it.
When they came out to announce the winners, one of the judges prefaced the awards with emphasis on the ability to present your findings. He really hammered on this. This made the guy inside me who wishes he knew more R feel like he was getting punched, but it made the guy who was on a visually driven team feel even more confident.
There was one team I was especially worried about. They presented on the success rates of consecutive pitch types. That idea was just too perfect and I turned to Aaron and said “Winner.”
I was right. They ended up with 1st but we got 2nd. As we packed up, we talked with members of the Orioles front office and the event sponsor, Booz Allen Hamilton. Alex spent most of the time explaining “Yes, you can do that with Tableau.”
It was an awesome experience. We won killer tickets to a future Orioles game. I’m hoping the Orioles had a good enough experience to host it again. It’s cool to see a MLB team and a big corporate partner get behind events like this.
Aaron wrote up his thoughts as well. The Baltimore Sun picked up the story from Aaron’s blog too.
Here’s our slidedeck:
Electronic chimes for church steeple
My grandma’s church has an old 8-track system from the late 1960s that plays fake carillon sounds at set times. It has stopped working, and she asked me to look at it. All I could figure was the amp was blown on it, but I’m not good at diagnosing that stuff.

Instead I thought I’d try to improve upon their current model considering it runs on one 8 track of about 20 songs and is impossibly cryptic to operate.
So I’ve ordered some parts from Adafruit and am going to try my hand at a full-blown Arduino project. Updates to come.
New logo
In the process of creating my new site, I decided I need to have some sort of logo/favicon to represent me. The one I ended up making wasn’t really intended for me, but it’ll do for now.
It also gave me a chance to play a bit with SVG manipulation via HTML.

The logo concept actually comes from one of those “Wouldn’t it be cool…” ideas I seem to have a lot of. In my current house, I thought about the basement having a bar feel to it. So then I thought what if it had a sports bar vibe. Original, right? As much as I love sports, I love sports photography and my sports photography friends even more. What if it was a sports photography bar with cool photos along the walls from friends and idols.
So the logo has the shutter leafs wrapped around the baseball diamond. Smushing my interest in third base and people crazy enough to play the position with the photography Rule of Thirds, I came up with Rule of Third.
Right now I have it set as my favicon and it appears as the site header if you’re in a narrow browser or browsing my site on mobile.
Someday I’ll have a proper sports photography bar or maybe a better logo to represent myself, but until then this logo will symbolize me on some parts of the internet.